x86 emulation currently requires hardware acceleration!

很久没有编译安卓的东西,创建了模拟器却发现启动不聊了。网上搜索了一下发现文章真是不少,但是里面说的东西下载地址却不是那个了。并且我安装了sdk之后也没有找到haxm-windows的安装程序。网上搜索了一下发现现在是个开源项目了。https://github.com/intel/haxm

HAXM is a cross-platform hardware-assisted virtualization engine (hypervisor), widely used as an accelerator for Android Emulator and QEMU. It has always supported running on Windows and macOS, and has been ported to other host operating systems as well, such as Linux and NetBSD.

HAXM runs as a kernel-mode driver on the host operating system, and provides a KVM-like interface to user space, thereby enabling applications like QEMU to utilize the hardware virtualization capabilities built into modern Intel CPUs, namely Intel Virtualization Technology.

下载安装就ok了,如果没有开启vt首先要去bios里面开启vt。


阿里云oss 批量检测文件是否存在

虽然阿里云oss的sdk提供了检测文件是否存在,但是在批量处理的时候你就会发现检测一次需要联网一次,如果文件过多最后会提示你链接数超过限制,最终无法进行检测了。

下面是阿里云提供的示例代码:

# -*- coding: utf-8 -*-
import oss2

# 阿里云主账号AccessKey拥有所有API的访问权限,风险很高。强烈建议您创建并使用RAM账号进行API访问或日常运维,请登录 https://ram.console.aliyun.com 创建RAM账号。
auth = oss2.Auth('', '')
# Endpoint以杭州为例,其它Region请按实际情况填写。
bucket = oss2.Bucket(auth, 'http://oss-cn-hangzhou.aliyuncs.com', '')

exist = bucket.object_exists('')
# 返回值为true表示文件存在,false表示文件不存在。
if exist:
	print('object exist')
else:
	print('object not eixst')

那么其实可以反过来想,直接拉文件目录落下来进行比较,列举文件的代码如下:

# -*- coding: utf-8 -*-

# 阿里云主账号AccessKey拥有所有API的访问权限,风险很高。强烈建议您创建并使用RAM账号进行API访问或日常运维,请登录 https://ram.console.aliyun.com 创建RAM账号。
auth = oss2.Auth('api-key', 'api-secret')
# Endpoint以杭州为例,其它Region请按实际情况填写。
bucket = oss2.Bucket(auth, 'https://oss-cn-beijing.aliyuncs.com', 'bucket-name')

file_arrary = []
# 设置Delimiter参数为正斜线(/)。
for obj in oss2.ObjectIterator(bucket, delimiter='/'):
    # 通过is_prefix方法判断obj是否为文件夹。s
    if obj.is_prefix():  # 文件夹
        #print('directory: ' + obj.key)
        for obj2 in oss2.ObjectIterator(bucket, prefix='%s' % obj.key):
            #print('file: ' + obj2.key)
            file_arrary.append(obj2.key)
    else:  # 文件
        file_arrary.append(obj.key)

如果要判断文件是否存在,只需要在数组中进行比较就可以了

file_arr = []
for file in file_arr:
    if file in file_arrary :
           print('esixts')
    else:
           print('not exists')


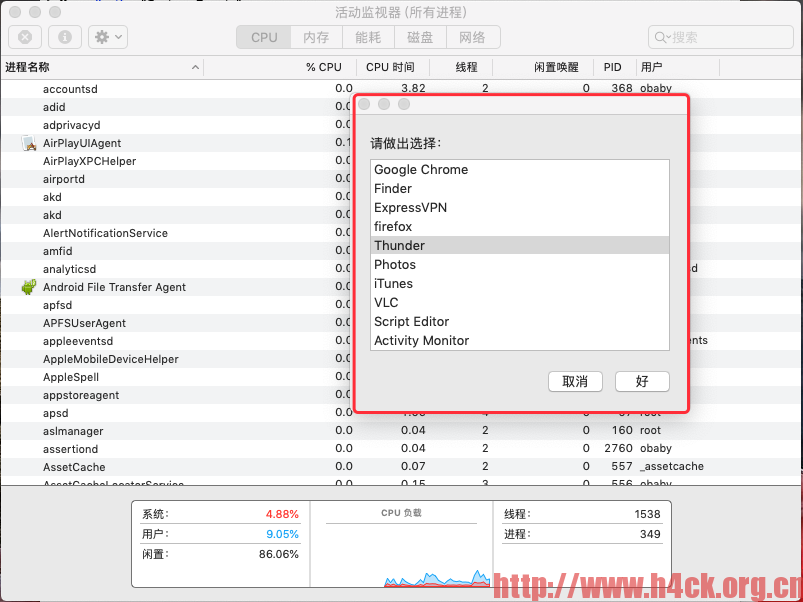
使用apple script管理进程

代码如下:

tell application "System Events"
	set listOfProcesses to (name of every process where background only is false)
	tell me to set selectedProcesses to choose from list listOfProcesses with multiple selections allowed
end tell
--The variable `selectedProcesses` will contain the list of selected items.
repeat with processName in selectedProcesses
	do shell script "Killall " & quoted form of processName
end repeat

和系统的活动监视器相比,好处在于只有前台进程。

xcode 9.2 集成obfuscator-llvm

Obfuscator-LLVM is a project initiated in June 2010 by the information security group of the University of Applied Sciences and Arts Western Switzerland of Yverdon-les-Bains (HEIG-VD).

The aim of this project is to provide an open-source fork of the LLVM compilation suite able to provide increased software security through code obfuscation and tamper-proofing. As we currently mostly work at the Intermediate Representation (IR) level, our tool is compatible with all programming languages (C, C++, Objective-C, Ada and Fortran) and target platforms (x86, x86-64, PowerPC, PowerPC-64, ARM, Thumb, SPARC, Alpha, CellSPU, MIPS, MSP430, SystemZ, and XCore) currently supported by LLVM.

对于这个插件,网上的安装文章相对来说还是挺多的,例如官方的文档https://github.com/obfuscator-llvm/obfuscator/wiki/Installation,再例如 http://www.exchen.net/ios-hacker-obfuscator-llvm-xcode%E9%9B%86%E6%88%90%E9%85%8D%E7%BD%AE.html。已经写的都非常详细了,按照上面的文章基本都可以配置好了,唯一需要注意的是如果xcode的版本不同,对应的里面的字符串可能不一致,例如:

<string>Apple LLVM 8.0</string> -> <string>Obfuscator 4.0</string>

如果用的是xcode9 那么应该是Apple LLVM 9.0。同时如果在编译之前没有安装cmake,可以通过homebrew来安装还是非常方便的。

brew install cmake

Homebrew installs the stuff you need that Apple didn’t.

如何安装homebrew请参考这个链接:https://brew.sh/

如果不想跳转上面的链接,直接在终端中执行下面的安装代码即可:

/usr/bin/ruby -e "$(curl -fsSL https://raw.githubusercontent.com/Homebrew/install/master/install)"

这里想说的是安装完成之后,还可能会出现别的问题,例如提示编译的时候提示下面的信息:

clang-4.0: error: cannot specify -o when generating multiple output files
Continue Reading

osx cycript image not found

今天在osx上运行cycript的时候出现了如下的错误:

/Users/obaby/Desktop/小项目/keygen/cycript_0.9.594/cycript
dyld: Library not loaded: /System/Library/Frameworks/Ruby.framework/Versions/2.0/usr/lib/libruby.2.0.0.dylib
Referenced from: /Users/obaby/Desktop/小项目/keygen/cycript_0.9.594/Cycript.lib/cycript-apl
Reason: image not found
Abort trap: 6

看起来貌似是因为libruby.2.0.0.dylib文件没有找到,打开ruby目录发现果然没有2.0的文件,只有2.3的。处理方法也很简单,直接把2.3的复制一份,改为2.0即可